Link to Website Index: 
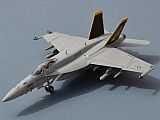
McDonnell Douglas (Boeing) F/A-18E Super Hornet
VFA-115 Eagles, USS Ronald Reagan, Gulf 2006
Tamiya (Italeri )1/72 with SuperScale Decals (72–905).
Link to Website Index:
The McDonnell Douglas (now Boeing) F/A-18 Hornet has served with the US Navy and
US Marines since the early 1980s, seeing combat against Libya, in the Gulf and over
the skies of Bosnia and Kosovo.
First generation aircraft were withdrawn from Carrier operations in 2018, to be replaced
by the F/A-18 E/F Super Hornet. The Super Hornet looks similar, but is effectively
a new aircraft, with an airframe 25% larger, more powerful engines, increased fuel
capacity and a significantly improved sensor/radar suite. A far larger Leading Edge
Root Extension (LERX) improves maneouvering characteristics, mathced with larger
squarer air intakes and an intake ramp.
The single seat F/A-18E fighter variant is complimented by a twin seater (The F/A-18F)
that has replaced the F-14 Tomcat, with the second seat occupied by an RSO/Weapons
controller/Battle Manager.
Super Hornets have also been equipped as air to air refuelers to replace the S-3B
Viking and in the form of the EA-18G "Growler" as ESM/EW aircraft to replace the
EA-6B Prowler.
Building the Tamiya/Italeri Super Hornet Kit:
Given my normal focus on non-grey British and European aircraft, you may not be surprised
to hear that this is my first attempt at building a Hornet model (of any type), albeit
that there are two more in the stash after this one. The Tamiya kit is actually
produced by Italeri in Italy, and was first issued in 1997. It has also been released
by Revell (although they do now have their own mould), who provided some rather more
interesting operational squadron decals, compared with the demonstrator markings
supplier by Italeri and Tamiya. Italeri’s most recent issues also have operational
squadron decals, plus there is a two seater kit, using most of the same parts. To
be honest, like the F-15, I reckon this is an aircraft that looks better with 2 seats.
Italeri’s most recent issues also have operational
squadron decals, plus there is a two seater kit, using most of the same parts. To
be honest, like the F-15, I reckon this is an aircraft that looks better with 2 seats.
Moulded in a soft and very thin grey plastic, the kit is surprisingly complex. I
hadn't realised before just how complicated the Hornet fuselage is, and Italeri's
solution is quite fragile. It requires careful assembly of the intakes in particular.
For some reason my port intake assembled much more easily than starboard, which
required some post assembly tidying up. It's not always obvious which parts of the
assemblies will touch - so thank goodness for MEK liquid glue! In many places, the
kit is too thin for my normal spring clips to be used safely, so finger pressure
and waiting is the norm.
Fortunately the parts are accurate with a good fit, so gaps were kept to a minimum,
albeit that I suspect some are unavoidable. I had to trim the upper wings slightly
to get them to fit tightly, but other than that, assembly was very straightforward.
As is often the case, in their enthusiasm to get a kit out into the market, Italeri
have based the model on a development aircraft and kept some prototype features that
didn't make it to the production version. Most obvious of these is the speed brake
between the two fins which needs to be closed and filled. The remaining speed brakes
are just above the wing root, and these are rarely seen open, so I filled these as
well.
Other joints needing filler included the step shaped upper and lower fuselage joint
just behind the wing. This is really quite difficult to get at, but if not filled
will leave a nasty step. Finally, the vent between upper and lower LERX, which Italeri/Tamiya
provide as a wedge shaped part also needs to be filled for a more recent aircraft,
as these have been disabled.


As befits a demonstrator aircraft, a good supply of potential armament is provided,
although a proper operational load is likely to be very different. Sidewinders, Harpoons,
HARMs, FLIR pod, AMRAAM and a centreline fuel pod are provided. A missile marked
as a “SLAM-SLC” is also provided. This looks a little like a SLAM-ER, but is significantly
too long (a scale meter) and looks nothing like a SLAM. I couldn’t find any info
on a SLAM-SLC. The extra length seems to be both forward of and behind the wings,
so trimming would be possible, but not entirely straightforward.
Interestingly, it seems that Super Hornets regularly fly with asymmetrical loads,
the aircraft’s fly-by-wire system making the required trim changes automatically.
One operational reason for this is to give the FLIR on the port cheek weapons station
a better field of view, hence the port inner pylon tends not to be used. Tamiya
tell you to disregard the single AMRAAM that is provided on the sprue, however it
does seem that aircraft regularly carry this on their starboard cheek weapons station.
I decided to go for a surface search/strike loadout, with two Harpoon anti-ship
missiles, two AMRAAMs for defence and two Sidewinders on the wing rails. One possible
shortfall of the kit (but I’m not fully convinced) is the apparent lack of outward
splay of the weapons pylons. Now in a lot of pictures this is accentuated by the
downward angle of the pylons, but it does seem that they do have some splay. And
so does my kit, if you look carefully. I didn’t add it, so perhaps the hoes were
already splayed. Its subtle, which some photos are not, so perhaps not as splayed
as it should be !
The undercarriage parts are nicely moulded and suitably robust for what is a large
kit once assembled. No internal weight was needed. Unfortunately there is a mistake
in the instructions, with the two forward most doors shown on the opposite sides
to where they should be.
Having decided to use the Superscale decals for VFA-115 onboard USS Ronald Reagan,
I also needed to add the updated conformal rectangular IFF patch (the BAE Systems
AN/APX-1111 "Pizza Box") seen on the top of the nose of that squadron's aircraft
- a simple addition was created from some spare plastic card. The other change which
I was unable to make, is the row of 10 cylindrical vents that exist between the tails
- I couldn’t think of any easy way to do these. The decals applied easily, perhaps
a little prone to silvering, but I had carefully “Kleared” the surface first, so
no major problems, except the yellow edges for the fins, one of which broke then
curled up. I had to do some rework by masking and painting them instead (white then
trainer yellow). Paints are all hand brushed, using Humbrol enamels (127 and 128).
Although first issued in 1997, this is still a modern and well designed kit. It
is a little fiddly to assemble, particularly the intakes and the fuselage, both of
which require a little faith and probable rework ! It can be assembled entirely
out the box if you use the supplied decals, but with a little extra work can become
a more recent “Super Bug”.
A few shots of F/A-18s from RIAT Fairford 2010 and 2012:
Background: An F-18 launches at sunset
US Navy Picture 201028-N-ZF088-1241 by MC3 Gabriel Martinez
The use of US Govt /DoD photographs on this site does not imply endorsement of this
site by the DoD or the US Govt
….and indeed, vice-versa…….


The Real Thing ! Above - Navy Photo 021009-N-9593M-004 by Photographer's Mate Airman
Philip A. McDaniel
Below - Photo Jerry Gunner via Wikipedia (used under CC 2.0 Licence)


Below - US Navy Photo 211004-N-DW158-1012 by MC3 Gray Gibson


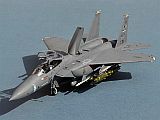
With this month’s other model build, an F-15E Strike Eagle:
