February 2017
AW101 Merlin Mk 3A
Link to Website Index: ![]()
Agusta Westland AW-
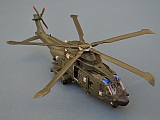
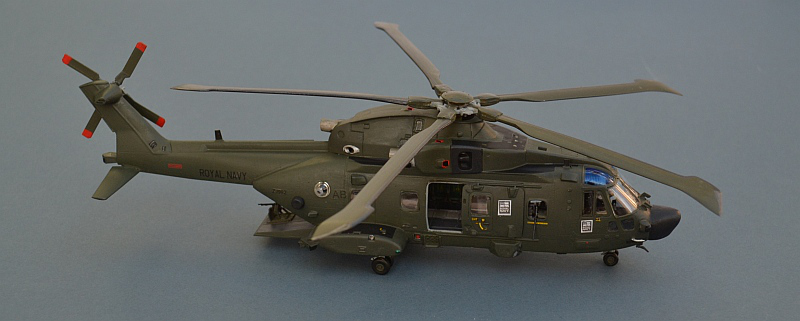
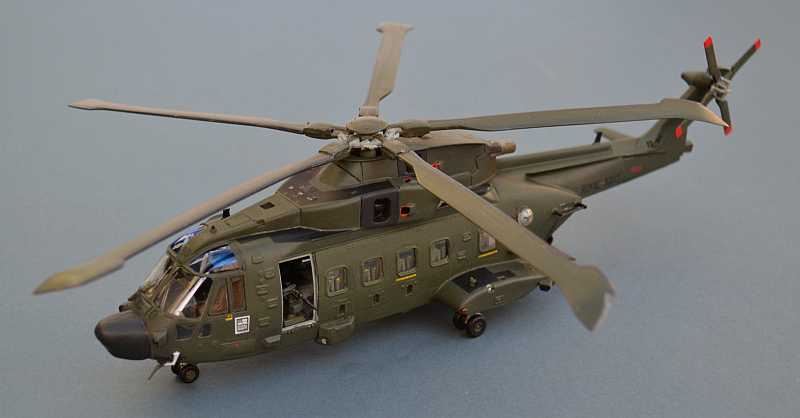
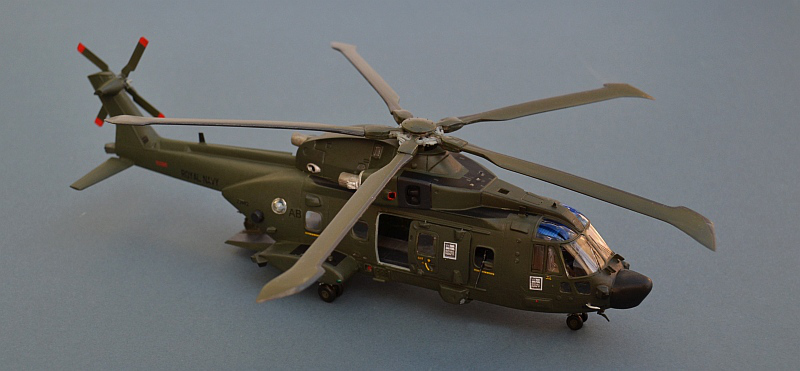
846 Sqn Fleet Air Arm, RNAS Yeovilton/RAF Benson, 2015.
Italeri 1/72 with scratch conversion
The EH101 Merlin has been in RN & RAF service since the late 1990s, with the HAS.1/HM.1 maritime version serving around the world on Frigates and Carriers of the RN, whilst the RAF’s HC.3 troop carriers served in Iraq & Afghanistan with the Joint Helicopter Command.
Built in the UK and Italy, with low level licence production in Japan, the EH101 first entered operational service with the RN in 2000, with the RAF variant following a year later. As of 2017, n ow known as the AW101, it has been sold to 12 different countries, with many now undergoing updates to a second generation version with glass cockpit and other avionics improvements to ensure service for many years to come.
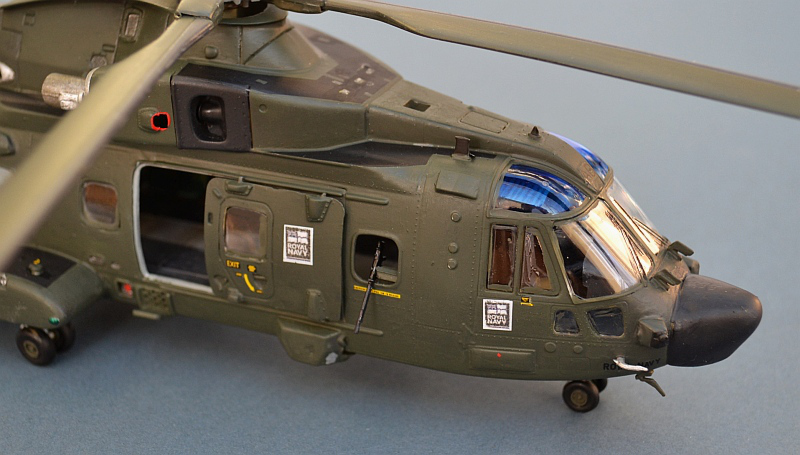
In 2007 the UK agreed a deal with the Danish government to transfer six unused Danish Air Force aircraft to the RAF, to help overcome equipment shortages in Afghanistan. New build AW101s were ordered to replace the Danish aircraft. These aircraft differ significantly from the RAF version, most noticeably with a distinctive nose housing a weather radar and low level IR ground avoidance system (disabled in RAF use), but laso with a different cabin and window layout, closer to the Canadian Cormorant SAR version.
Although not deployed operationally themselves, the HC.3A, as the ex-
Link to Website Index: ![]()
www.gengriz.co.uk
Background Image: Merlin HC.3 at RIAT 2015
The Italeri/Revell Merlin kit will be familiar to many. Issued in 2002, when it
first appeared, Revell’s was the RAF HC.3 transport version and Italeri’s the RN's
HAS.1 anti-
Across these various re-
Kit buildability is like most helicopter kits; you either like them or hate them,
but whilst some parts are definitely fiddly, there are no really difficult areas.
The basic mold is carefully laid out to allow the significant differences between
all of the different variants to be covered by adding or subtracting different sprues
for each issue. With ramp/without and the differing window set-
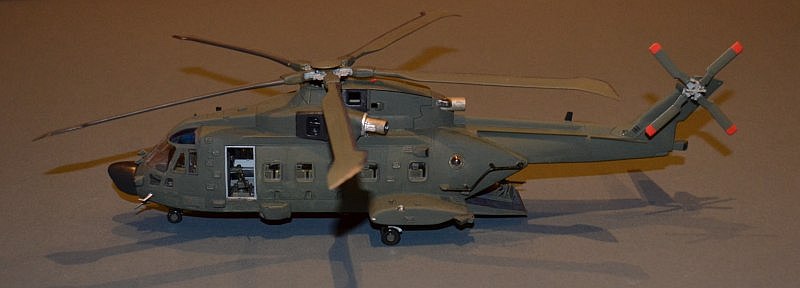
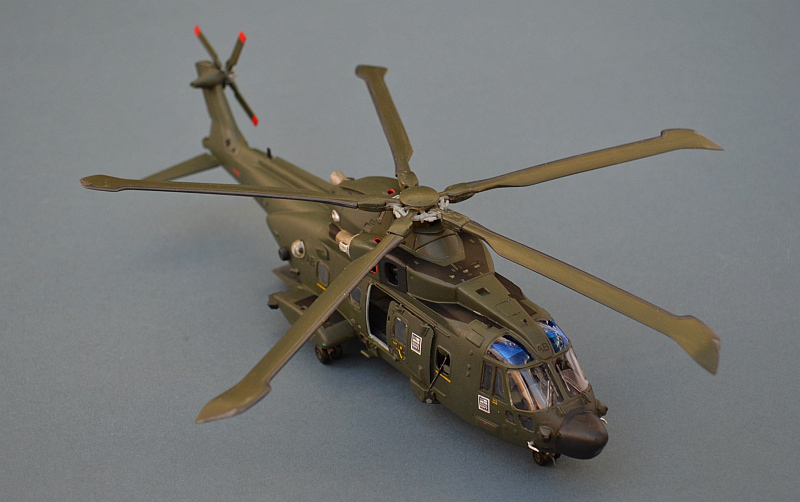
For this build I want to create a replica of one of the HC.3A aircraft now being used by the Royal Navy alongside normal HC.3s as replacements for the venerable Sea King HC.4. The HC.3A differs from the HC.3 because it is based on an order originally placed by the Danish government for a SAR/and CSAR/Troop transport fleet.
846 Naval Air Squadron
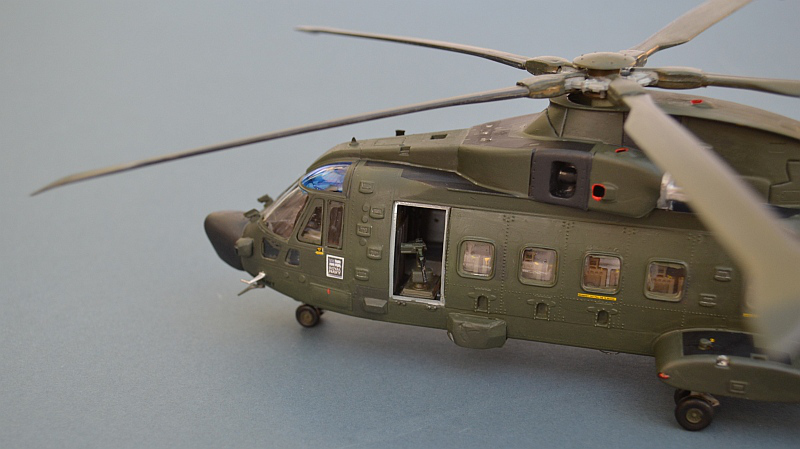
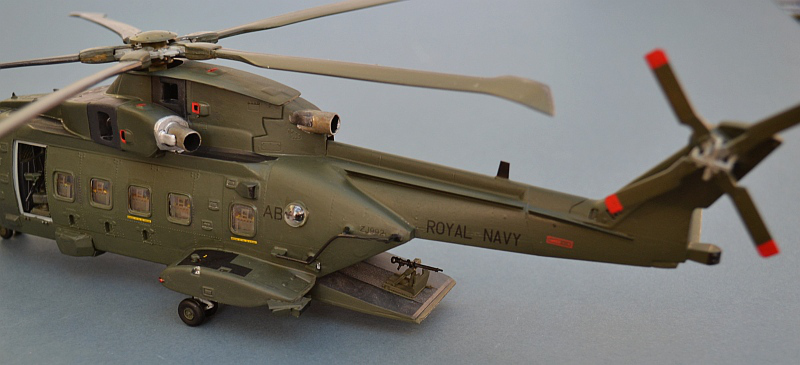
The HC.3A features a number of obvious differences; not least the fitment of a commercial weather radar antenna on the aircraft nose along with a low level collision avoidance system. The airframes also feature the window layout of the Cormorant and civil EH/AW101s. Fortunately Italeri cover some of these differences in several of their kits; for this one I have used the James Bond 50th Anniversary issue, featuring the Merlin helicopter used by the villain to attack Bond's parents’ house.
This particular kit is a bit of a mish-
Nose radome -
Windows -
Twin Wheels -
EW Mountings -
Wheel Stub Wings -
Flare Ejectors -
New Winch -
Crew Door -
Sponson Floats and other bits and bobs -
Window and ramp guns -
Under-
The UK Strategic Defence & Security Review of 2012 identified an urgent need to replace the ageing Sea King HC.4 air craft used by the RN Commando Helicopter Force, so it was decided to transfer all of the RAF’s Merlins into Fleet Air Arm use. After a period operating alongside their former owners at RAF Benson, the RN’s new helicopter finally took over from the Sea King in 2016.
It is intended to convert the entire force to a fully marinised troop carrying HC.4 variant (e.g with power blade and tail fold) in a progressive programme that continues until the 2020s (the first aircraft was delivered late in 2016), but as an interim measure until then, seven airframes have seen limited marinisation, e.g. with a manual blade fold allowing their early deployment at sea onboard the RN Helicopter Carrier HMS OCEAN.
The first step was to clone the additional EW/ESM parts from my HC.3 kit. For this I used silicone moulding putty that you melt in boiling water, then mould around the master part and allow to cool. Once it hardens you can fill the mould with Milliput to create mould new parts.
This silicone putty really is superb stuff that I obtained on Amazon for less that
£10. It Is entirely re-
This is the second time I have used it, the first to replace a missing wheel half
from my B-
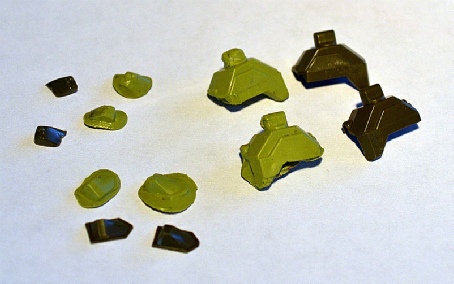
Thick superglue was then used to attach them to the kit parts and fill any small gaps.
The rear sponsons also needed a little modification to hold the UK spec flare launchers;
once again I used the HC.3 kit as a master, but this time for some good old-
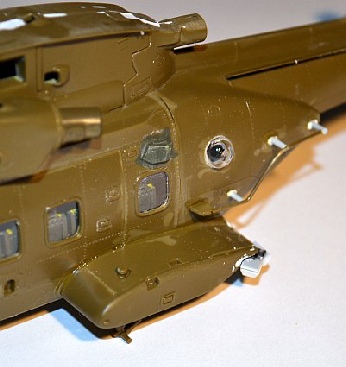
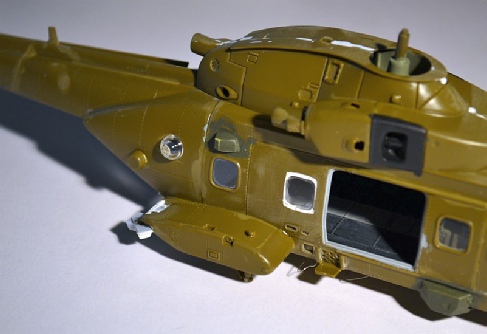
As you can see below, the rest of the build progressed alongside my scratch changes, and at this point I also applied a little paint to the Milliput parts, mainly to see how much more smoothing out they might need to remove the moulding roughness.
You can also see where I have opened up the missing window on the starboard side, using a little Tippex to smooth out its edges.

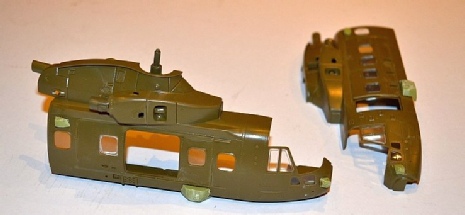
The underside of the aircraft needed a little attention; this is perhaps one of the poorest parts of these kits (the early ASW Merlin kit doesn’t even have the dipping sonar well, although this has been corrected in later issues).
The radio antenna on the port aft side was scratched up from sprue, using the HC.3 kit as a template yet again. Getting a smooth fit of the bubble windows (they are marked by indents in the plastic but need to be cut out) is a little challenging and Tippex can’t really help here.
I’ve also added the sprue based flare launchers to the sponsons; the current versions seem to differ quite markedly from those in the HC.3 kit. As you can see the joint between the main fuselage and the rear portion needs a little care in assembly and a little filler, as do the side panels with the main windows and the sponsons.
Nothing that should be beyond the careful modeller though.
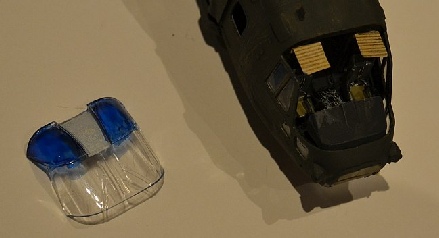
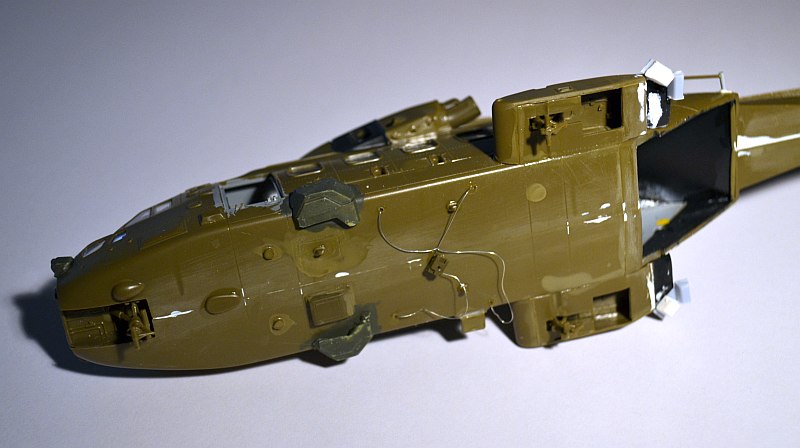
Blue marker pen was used on the upper parts of the cabin windows, along with paper
sun-
The new nose was created entirely by eye; there are plenty of pictures on the web, but no plans that I can find. I used part of a fuel tank to provide the pointy radar part, then filled in the rest of it with Milliput and sanded to shape. The removed IR window was represented simply by painting on. By using the existing kit nose as a backing part, I ensured that it would fit reasonably well afterward. In retrospect, there does seem to be fairing on the top of the nose that I have missed, but in truth, the real thing really does look as awkward as my representation.
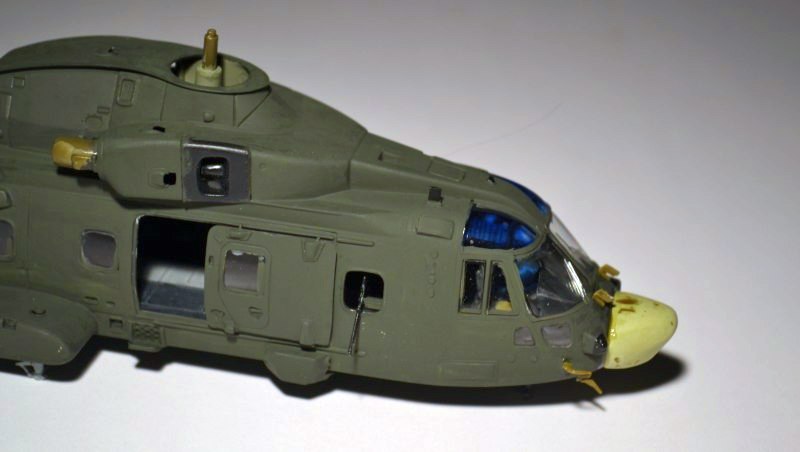
The green paint provided me with a bit of a conundrum. None of the recommended paints
look right to me (the ex-
With the main paint applied, it was time to consider decals. Junglie Merlins have relatively few markings anyway, so much of what I needed came from the Skyfall kit. However the missing ones needed to be made up from inkjet decals, using Powerpoint to create the artwork.
Again this is not my first time with these, but some of them (e.g. the square Royal Navy markings) were quite intricate in detail and probably on the limit of my printer. I used clear paper, but with white backing where needed.
The end product is generally OK, but I find they are a little thick and curl up after application, thus they are very prone to silvering.
… And finally, after decals , detail painting and a top coat of acrylic matt varnish (Windsor & Newton), I have an HC.3A to add to my collection!
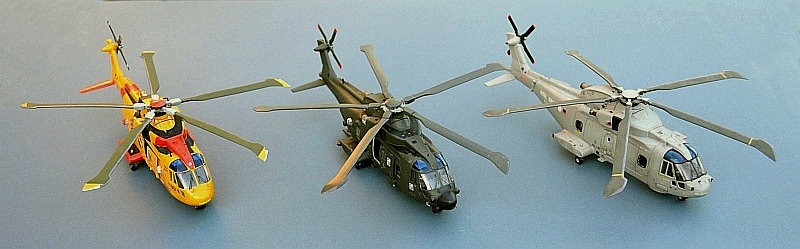
Have a look at my Helicopter pages for more Merlins and many others.