March 2023
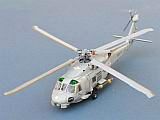
Sikorsky SH-
Link to Website Index: ![]()
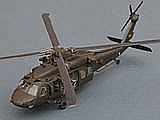
Sikorsky S-
10th Aviation Regiment US Army, Helmand Province, Afghanistan 2007.
Revell (Italeri) 1/72
Link to Website Index: ![]()
© www.gengriz.co.uk
The first member of the ubiquitous Sikorsky S-
The S-
Although the design celebrated its 40th year in 2019, it has seen a renaissance of
late, with a number of existing S-
Building the Revell Black Hawk Kit:
This is my second Black Hawk build, the first having been a Hasegawa HH-
This Revell kit, which was originally an Italeri mould, has lightly raised panel
lines, but seems to be a better kit overall, with more detail and many more parts.
I also have a Fujimi one to build (also, bizarrely, the non-
 This kit is not quite such a well engineered fit as Hasegawa or Fujimi, but nothing
that can't be addressed. The clear parts, unfortunately, are a weak point. There
are no lips to ensure a good fit, and I found that the cockpit door windows were
slightly smaller than the gap into which they are supposed to fit, making it quite
difficult to keep them in place whilst the glue set. Conversely, the lower footwell
windows are not quite the right shape and a little too large; I got them into place,
but will need to sand down their upper edges to make them flush before painting.
In a similar vein, the port cockpit door can be posed open; like a number of other
Italeri "open cockpits", this results in them not fitting well if you want them closed
and mine ended up with a tiny gap along the top edge that had to be filled with Krystal
Kleer.
This kit is not quite such a well engineered fit as Hasegawa or Fujimi, but nothing
that can't be addressed. The clear parts, unfortunately, are a weak point. There
are no lips to ensure a good fit, and I found that the cockpit door windows were
slightly smaller than the gap into which they are supposed to fit, making it quite
difficult to keep them in place whilst the glue set. Conversely, the lower footwell
windows are not quite the right shape and a little too large; I got them into place,
but will need to sand down their upper edges to make them flush before painting.
In a similar vein, the port cockpit door can be posed open; like a number of other
Italeri "open cockpits", this results in them not fitting well if you want them closed
and mine ended up with a tiny gap along the top edge that had to be filled with Krystal
Kleer.
As with most UH-
The kit includes two decal options (both Iraq, one sand and one olive green) and
two arming options, (rockets/missiles or cabin machine guns). I chose the green
option without missiles, which claims to be the 10th Mountain Aviation Regiment in
Iraq in 2008. I managed to find some pictures of the aircraft in Afghanistan the
year before, at which point it had the anti-
Unlike my very robust Hasegawa kit, the rotor attachments on this Italeri/Revell one are very fragile and one collapsed as soon as I placed it on the kit (24hr+ after attachment), with another immediately showing some weakness. The rotor head detail is reasonably well done, although the vertical links are quite difficult to get into place and if it falls apart before the kit is even complete, it is not likely to win any new enthusiasts to helicopter building!
The kit was finished with a coat of Klear to allow the decals to bed in without silvering, then 2 coats of Windsor & Newton matt acrylic varnish to finish. Final assembly saw the wheels added and the rotor head permanently fixed up top, revealing two more niggles: the kit sits too high on its undercarriage, almost as if it is in flight. The rotor head also seems to be too high compared with the Hasegawa kit (possibly the gearbox part is too long). Both of these issues detracted from my overall impression of this kit, which is still positive, but although its detail is finer and better it does highlight the superior mould design and engineering of the Hasegawa kit in particular.
Link to many more helicopter kit builds on my Helos pages
Part 1